Sometimes, the best treats are the simplest—no oven, no fuss, just good old-fashioned comfort in a bar. These no-bake peanut butter bars are my go-to when I want something sweet but don’t want to deal with melting chocolate or waiting for dough to chill. They come together in minutes, and the smell of peanut butter and vanilla filling the kitchen is a real highlight.
Growing up, these bars were a regular after-school snack, and even now, they remind me of lazy weekend afternoons and the kind of homemade sweetness that feels like a small, cozy victory. It’s surprising how a handful of pantry staples can turn into something so satisfying—a little sticky, a little salty, with that irresistible peanut butter richness.
Focusing on the nostalgic comfort and simplicity of no-bake treats, this recipe highlights how a few pantry staples can come together quickly, offering a moment of indulgence without turning on the stove. It’s about reclaiming time in a busy day, and rediscovering the joy of a familiar, homemade snack that feels like a warm hug.
Unexpected Joy of Pantry Staples
- These bars remind me of lazy Sunday afternoons when I’d help my grandma in the kitchen, feeling like a tiny hero with a spoon in hand.
- I love how quickly they come together—sometimes, I just need a little sweet fix, and these are my instant solution.
- There’s a quiet satisfaction in pressing the peanut buttery mixture into the pan, knowing I’ll have a crunchy, gooey treat soon.
- Whenever I make these, the smell of toasted peanut butter and vanilla takes me right back to childhood comfort and simple joys.
- Making these bars is almost meditative—measuring, mixing, pressing—each step a small act of self-care in a busy day.
Unexpected Joy of Pantry Staples
- This recipe was born out of a lazy afternoon craving that couldn’t wait for melting chocolate or baking time. I wanted something I could toss together quickly, without fuss, yet still feel special—like a secret treat in my own kitchen. The simplicity of peanut butter, graham crackers, and a dash of vanilla somehow always hits the spot, no matter how hectic the day.
- One day, I was digging through my pantry and realized I had all the ingredients for these bars—no need for trips or complicated steps. That moment of spontaneous creation, pressing that sticky mixture into the pan, felt like reclaiming a little piece of calm amid chaos. Now, these bars are my comfort, my quick fix, and a reminder that sometimes the simplest ingredients make the sweetest memories.
- heading: Short Personal Story
Contextual origin, trivia, or history
- These bars gained popularity during the mid-20th century as a quick, no-fuss treat in American households.
- The combination of peanut butter and graham crackers was a clever way to create a satisfying snack without baking, especially during wartime shortages.
- In some regions, similar no-bake bars are called ‘peanut butter haystacks’ or ‘peanut butter squares,’ reflecting local variations.
- The concept of no-bake desserts surged in popularity with the rise of convenience foods in the 1950s and 60s, making these bars a staple in home kitchens.
- Quirky fact: the first commercial peanut butter bars were sold as energy snacks for soldiers and outdoor enthusiasts in the 20th century.
Key Ingredients Breakdown
- Creamy peanut butter: I prefer chunky for texture, but smooth works too—look for natural, oozing from the jar with a rich, nutty aroma. Swap with almond butter if you like a different nut flavor, but expect a subtler finish.
- Graham cracker crumbs: I like crushing my own for a coarser crunch, which adds a satisfying snap. You can replace with digestive biscuits if you’re outside the US, but the flavor’s a bit sweeter and more buttery.
- Honey or maple syrup: A touch of sweetness to balance the saltiness—smells like caramel when melted and gooey. Use agave for a neutral sweetness, but it’s less fragrant and a bit thinner.
- Butter: I melt unsalted butter until it’s just shimmering, smelling all warm and toasty. You can substitute with coconut oil for a dairy-free option, which adds a faint coconut scent and a firmer texture.
- Vanilla extract: Just a splash lifts everything with a sweet, floral note—smells like a bakery. Swap with vanilla bean paste if you want a deeper, more intense vanilla punch.
- Chocolate chips (optional): I toss in semi-sweet for a balanced flavor that melts into a glossy top. Dark chocolate is richer, but milk chocolate adds a sweeter, creamier finish. You can skip or add chopped nuts for extra crunch.
Spotlight on key ingredients
Peanut Butter:
- Creamy peanut butter: I prefer chunky for texture, but smooth works too—look for natural, oozing from the jar with a rich, nutty aroma. Swap with almond butter if you like a different nut flavor, but expect a subtler finish.
- Graham cracker crumbs: I like crushing my own for a coarser crunch, which adds a satisfying snap. You can replace with digestive biscuits if you’re outside the US, but the flavor’s a bit sweeter and more buttery.
Sweetener & Add-ins:
- Honey or maple syrup: A touch of sweetness to balance the saltiness—smells like caramel when melted and gooey. Use agave for a neutral sweetness, but it’s less fragrant and a bit thinner.
- Chocolate chips (optional): I toss in semi-sweet for a balanced flavor that melts into a glossy top. Dark chocolate is richer, but milk chocolate adds a sweeter, creamier finish. You can skip or add chopped nuts for extra crunch.
Notes for ingredient swaps
- Dairy-Free: Swap butter for coconut oil to keep the bars firm and add a subtle coconut aroma.
- Nut Butter Variations: Use almond or cashew butter for a different nutty flavor, but expect a softer, less salty bite.
- Sweetener Options: Replace honey with agave syrup or maple syrup; each will slightly alter the flavor and consistency.
- Cracker Alternatives: Digestive biscuits or rice cereal can replace graham crackers for different crunch and flavor profiles.
- Chocolate Coatings: Dark chocolate, milk chocolate, or carob chips can be used interchangeably, affecting sweetness and richness.
Equipment & Tools
- 20×20 cm (8×8 inch) pan: To hold and shape the mixture into a neat block.
- Parchment paper: For easy removal and cleanup.
- Microwave-safe bowl: To melt and combine peanut butter and honey quickly.
- Spatula: To mix ingredients and press the mixture evenly.
- Sharp knife: To cut clean, even squares.
Step-by-step guide to no-bake bars
- Equip a 20×20 cm (8×8 inch) square pan; line with parchment paper for easy removal.
- In a microwave-safe bowl, combine 1 cup (250 g) creamy peanut butter and 1/2 cup (120 ml) honey or maple syrup. Microwave in 20-second bursts, stirring each time, until smooth and oozy, about 1 minute total.
- Add 1 teaspoon vanilla extract to the peanut butter mixture; stir until fragrant and well incorporated.
- In a separate bowl, crush 1 1/2 cups (150 g) graham cracker crumbs—either crush in a zip-top bag with a rolling pin or pulse in a food processor for finer texture.
- Pour the graham cracker crumbs into the peanut butter mixture; fold until evenly coated and sticky.
- Press the mixture firmly into the prepared pan, using the back of a spatula or your fingers to spread evenly and compact. The surface should be smooth and slightly shiny, with no gaps.
- Optional: sprinkle 1/2 cup (90 g) chocolate chips over the top and gently press in for a glossy finish. Alternatively, melt and drizzle chocolate for a more decadent look.
- Refrigerate uncovered for at least 2 hours, or until firm and set. For quicker results, freeze for 1 hour.
- Once set, lift the block out of the pan using the parchment edges. Cut into 16 squares with a sharp knife, wiping the blade between cuts for clean edges.
- Serve immediately or store in an airtight container in the fridge for up to a week. For longer storage, freeze and thaw in the fridge before serving.
Refrigerate the bars until fully firm, about 2 hours. Slice into neat squares and serve directly from the fridge. Wrap leftovers tightly or store in an airtight container in the fridge for up to a week, or freeze for longer storage.
How to Know It’s Done
- The mixture is firm and slightly shiny when pressed into the pan.
- The pressed layer holds together when cut without crumbling apart.
- Chocolate chips or drizzle are glossy and set after refrigeration.
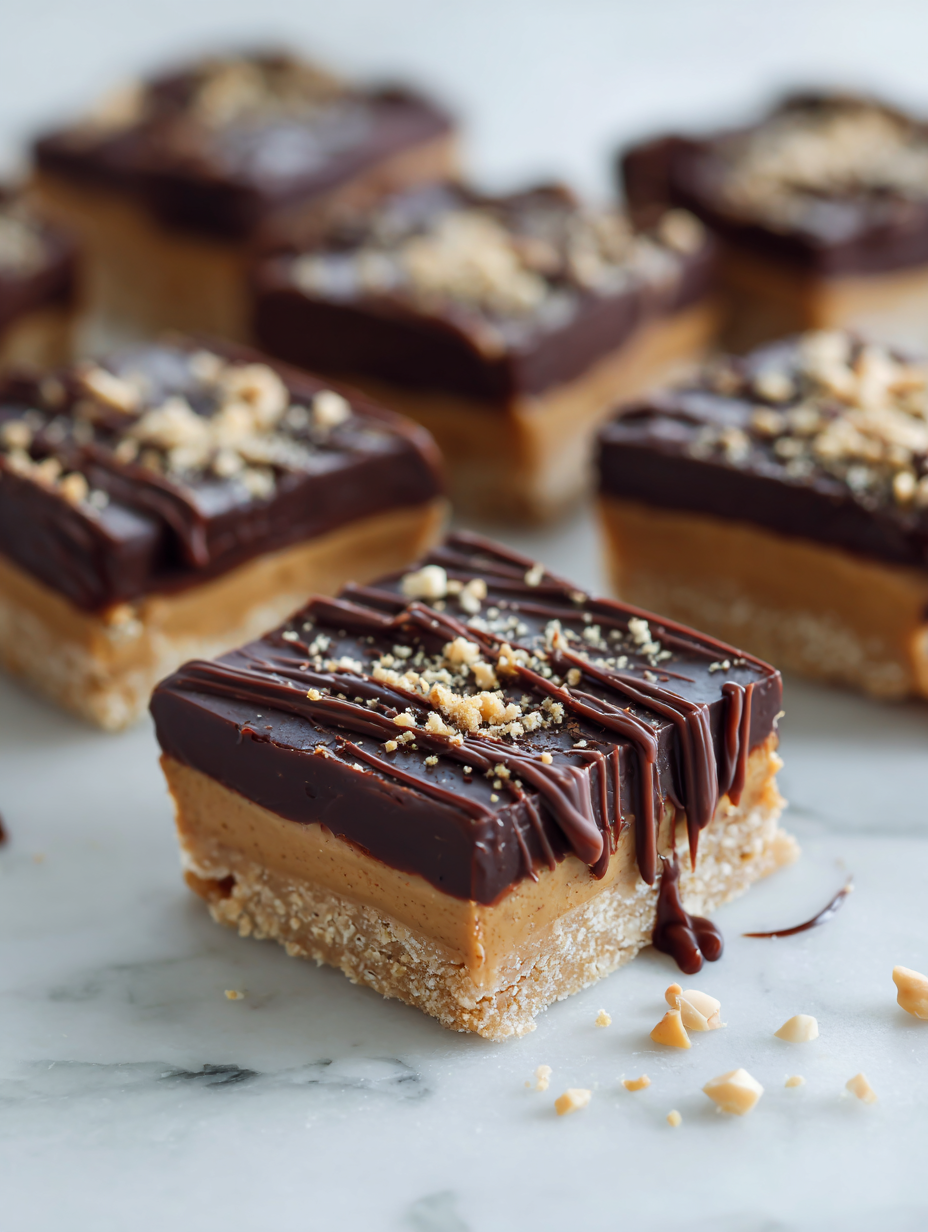
No-Bake Peanut Butter Bars
Ingredients
Equipment
Method
- Line your pan with parchment paper, leaving some overhang for easy removal.
- Combine the peanut butter and honey in a microwave-safe bowl. Microwave in 20-second bursts, stirring each time, until the mixture is smooth, warm, and fragrant—about 1 minute total.
- Add the vanilla extract to the warm mixture and stir well to incorporate the aromatic vanilla.
- In a separate bowl, crush the graham crackers into coarse crumbs using your hands or a rolling pin, or pulse briefly in a food processor for finer texture.
- Pour the graham cracker crumbs into the peanut butter mixture and gently fold until everything is evenly coated and sticky—this is where the mixture starts to pull together.
- Transfer the thick, sticky mixture into the prepared pan. Use the back of a spatula or your fingers to press it down firmly and evenly, creating a smooth surface. Pressing tightly helps the bars hold together better.
- If you like, sprinkle chocolate chips over the top and gently press them into the surface for a glossy, chocolatey finish.
- Refrigerate the pan uncovered for at least 2 hours, or until the mixture is firm and set. For quicker results, you can freeze it for about 1 hour.
- Once set, lift the entire block out of the pan using the parchment overhang. Place on a cutting board and use a sharp knife to cut into 16 even squares.
- Serve immediately or store leftovers in an airtight container in the fridge. These bars stay fresh for about a week and can also be frozen for longer storage.
Notes
Pro tips for perfect bars
- Cooler ingredients: Chill your peanut butter slightly before mixing to make the process smoother and less sticky.
- Press firmly: Use the back of a spatula or your fingers to really pack down the mixture for even slices and better texture.
- Chill for success: Refrigerate until firm—at least 2 hours—so the bars hold together when cut and don’t crumble.
- Add texture: Sprinkle chopped nuts or mini chocolate chips on top before chilling for extra crunch and flavor.
- Warm the mixture: Slightly warm honey or syrup before mixing helps create a smoother, more cohesive batter.
- Even cuts: Use a hot, sharp knife wiped clean between slices to get neat, clean edges without squishing the bars.
- Chocolate drizzle: For a glossy finish, melt chocolate slowly and drizzle thinly over the chilled bars, then chill again briefly.
Common mistakes and how to fix them
- FORGOT to measure ingredients precisely → Use a scale for accuracy and consistent results.
- DUMPED mixture into pan without pressing → Firmly press for even texture and better set.
- OVER-TORCHED chocolate chips → Remove from heat early; gently melt for glossy finish.
- MISSED chilling time → Chill at least 2 hours for proper firmness and clean cuts.
Quick Fixes & Pantry Swaps
- If mixture is too thick, splash in a teaspoon of milk to loosen it.
- When bars crack while cutting, patch with a warm, damp cloth for cleaner edges.
- Splash a little hot water on the chocolate drizzle for a shiny, smooth finish.
- When mixture is sticky, dump in more graham cracker crumbs for better texture.
- When in doubt, rescue a crumbly batch by pressing it firmly back into the pan.
Prep, store, and reheat tips
- Prepare the peanut butter mixture and press into the pan up to a day in advance; keep covered in the fridge for a firm, ready-to-cut texture.
- Bars can be stored in an airtight container in the fridge for up to a week, developing a slightly richer, more cohesive flavor over time.
- For longer storage, freeze the bars wrapped tightly in plastic wrap and an airtight container for up to three months; thaw in the fridge before serving.
- Reheat slices briefly at room temperature or in the microwave (10–15 seconds) until just softening, releasing that familiar peanut butter aroma and a gooey bite.
Top questions about no-bake peanut butter bars
1. Can I use natural peanut butter?
Yes, you can use natural peanut butter, but it might be a bit runnier, so adjust the honey slightly to compensate.
2. Should I refrigerate the bars?
Leaving the bars at room temperature for a few hours softens them, but for best texture, refrigerate until firm.
3. Can I substitute the peanut butter?
Absolutely, try almond or cashew butter for a different nutty flavor that still holds together well.
4. Can I use a different sweetener?
Yes, you can swap honey for maple syrup or agave; expect slight changes in sweetness and texture.
5. How long should I chill the bars?
Chilling for at least 2 hours ensures the bars are firm enough to cut cleanly and hold shape.
6. Can I omit the chocolate toppings?
You can skip the chocolate chips or drizzle if you prefer a less sweet, more peanut-forward flavor.
7. How do I cut the bars neatly?
Use a sharp, hot knife to get clean slices—wipe it between cuts for the best edges.
8. How should I store these bars?
Store leftovers in an airtight container in the fridge for up to a week or freeze for longer storage.
9. Can I make these in advance?
Yes, these bars can be made a day ahead; just keep them covered in the fridge to stay fresh.
10. What if the mixture is too sticky?
If the mixture is too sticky, add a bit more graham cracker crumbs to help it press into the pan.
These no-bake peanut butter bars are more than just a quick treat—they’re a small act of nostalgia and comfort that you can whip up in minutes. When the fridge is calling for a sweet fix, I reach for these, and they never disappoint with that rich, salty-sweet bite.
In a world that moves too fast, these bars offer a moment of simple satisfaction. They remind me how a handful of pantry staples can turn into something surprisingly satisfying, a little sticky, a little crunchy, and always just right.

Hi, I’m Mason Harper, the voice and heart behind Rooting in Freshness. I’m so glad you’re here. This space was born from my love for seasonal ingredients, simple cooking, and the belief that food tastes better when it’s grown, chosen, and prepared with intention. Rooting in Freshness is more than a food blog to me. It is a reflection of how I live, cook, and connect with the world around me.

Leave a Reply