When I first tried making sticky pork ribs, I didn’t expect the glaze to become such a central part of the experience. Watching the sauce bubble and turn a deep, glossy caramel right before my eyes felt almost like a little magic trick happening in my own kitchen. It’s that moment—when the sugar and soy meet heat—that transforms simple ribs into something irresistibly finger-licking.
This recipe is about more than just the final taste; it’s about the process. The slow simmer, the careful broil, and that final burst of high heat to caramelize everything into a shiny, smoky crust. It’s messy, a little chaotic, but every sticky, sweet, smoky bite makes all the fuss worthwhile. Plus, it’s a dish that invites you to get your hands dirty and really enjoy the cooking.
Focusing on the sticky, caramelized glaze that develops during the final broil, I see it as a chance to turn simple pork ribs into a glossy, finger-licking masterpiece. It’s about the magic of watching that sauce bubble and thicken, creating a surface that’s both sweet and smoky, almost like a crust of burnt sugar. This approach makes the process feel less like a recipe and more like an interactive, sensory experience in my own kitchen.
Caramelized Glaze Secrets
- Watching the glaze turn a rich amber as it bubbles is oddly satisfying, like witnessing a small miracle.
- I love the chaos of sticky fingers and sauce-smeared lips—it’s messy but so worth it.
- There’s a nostalgic joy in biting into ribs that are crispy on the outside and tender inside, coated in that glossy, smoky glaze.
- Sometimes, I get a little proud when friends ask for the recipe—like I’ve unlocked a secret they all want to know.
The story behind this recipe
- This recipe was born out of late-night craving for something sweet, smoky, and totally messy. I remember standing in my kitchen, sticky sauce dripping off my fingers, thinking how rare it is to find a dish that’s both indulgent and approachable. It’s that balance—getting your hands dirty but ending with something deeply satisfying—that keeps me coming back to these ribs.
- I love how the glaze transforms during the final broil, becoming almost like a caramel crust that crackles when you bite into it. It’s a bit chaotic to watch, but that’s part of the fun—shaping the sticky, smoky coating into something almost like a jewel. Every time I make these, I feel like I’m turning simple ingredients into a small celebration of flavor and texture.
- heading: ‘The magic of the glaze’
History and Fun Facts
- Pork ribs have been a staple in Southern barbecue traditions for centuries, with regional variations highlighting local spice blends and smoking techniques.
- The sticky glaze concept traces back to Chinese char siu, where honey and soy create a shiny, caramelized crust that inspired many Western adaptations.
- During the 20th century, American barbecue evolved to emphasize both smoky slow-cooking and sweet, sticky sauces, blending culinary influences from around the world.
- The term ‘sticky ribs’ often refers to the irresistibly caramelized surface, a result of sugar-based sauces that undergo Maillard reactions during broiling.
Key Ingredients Breakdown
- Pork ribs: I love using meaty, well-marbled ribs for extra juiciness, but you can swap in chicken thighs if you want less fuss. Expect a different texture, less fall-off-the-bone, but still flavorful.
- Soy sauce: It’s the salty backbone of this glaze, giving depth and umami. You can try coconut aminos for a milder, slightly sweeter profile—just reduce the sugar a bit.
- Honey: Adds that glossy, caramelized finish, along with a floral sweetness. Maple syrup works fine as a substitute, but it’ll bring a different, richer flavor and darker color.
- Garlic: The aroma of roasting garlic is key here. Use fresh for punch, or roasted garlic for a mellow, sweet note—either way, it’s the fragrant heart of the glaze.
- Brown sugar: It’s what gives the glaze its sticky, caramel crust. You can use coconut sugar for a slightly healthier, more complex flavor—expect a darker, more molasses-like finish.
- Rice vinegar: Brightens everything up and balances the sweetness. Apple cider vinegar can be a good swap—just taste and adjust to keep the zing.
- Sesame oil: A little goes a long way—adds a smoky nuttiness. If you don’t have it, toasted olive oil can add a similar depth, but skip if you want to keep it traditional.
Spotlight on key ingredients
Pork Ribs:
- I love using meaty, well-marbled ribs for extra juiciness, but you can swap in chicken thighs if you want less fuss. Expect a different texture, less fall-off-the-bone, but still flavorful.
- Soy sauce: It’s the salty backbone of this glaze, giving depth and umami. You can try coconut aminos for a milder, slightly sweeter profile—just reduce the sugar a bit.
- Honey: Adds that glossy, caramelized finish, along with a floral sweetness. Maple syrup works fine as a substitute, but it’ll bring a different, richer flavor and darker color.
Honey:
- Garlic: The aroma of roasting garlic is key here. Use fresh for punch, or roasted garlic for a mellow, sweet note—either way, it’s the fragrant heart of the glaze.
- Brown sugar: It’s what gives the glaze its sticky, caramel crust. You can use coconut sugar for a slightly healthier, more complex flavor—expect a darker, more molasses-like finish.
- Rice vinegar: Brightens everything up and balances the sweetness. Apple cider vinegar can be a good swap—just taste and adjust to keep the zing.
Notes for ingredient swaps
- Pork Ribs: I prefer using spare ribs for more meat and flavor, but baby back ribs cook faster and are leaner—adjust cooking time accordingly.
- Soy Sauce: Tamari or coconut aminos can replace soy sauce for gluten-free or milder options—expect a slightly different depth of umami.
- Honey: Maple syrup or agave nectar can be used as substitutes, adding their own unique sweetness and aroma, but may alter the sticky, caramelized finish.
- Garlic: Fresh garlic is ideal for bold aroma, but roasted garlic offers a mellow sweetness—either works depending on your flavor preference.
- Brown Sugar: Coconut sugar provides a more complex, molasses-like flavor with less sweetness, while white sugar will make the glaze less dark but still sticky.
- Rice Vinegar: Apple cider vinegar can brighten the glaze similarly, though it’s slightly fruitier—taste and adjust the quantity to balance sweetness.
- Sesame Oil: Toasted olive oil can mimic the smoky nutty note, but skip if you prefer a traditional sesame aroma—use sparingly for best effect.
Equipment & Tools
- baking sheet: To hold the ribs during baking and broiling.
- aluminum foil: To wrap the ribs for slow cooking and retain moisture.
- basting brush: To evenly apply glaze before broiling.
- small saucepan: To prepare and thicken the glaze.
- oven: For slow baking and broiling.
Step-by-step guide to sticky ribs
- Gather your equipment: a sturdy baking sheet, aluminum foil, a basting brush, and a small saucepan for the glaze. Preheat your oven to 150°C (300°F).
- Prepare the ribs: pat them dry, then season generously with salt and pepper. Wrap tightly in foil, shiny side in, and place on the baking sheet.
- Bake slow and low: slide the ribs into the oven. Cook for 2.5 to 3 hours until they’re tender and the meat pulls back from the bones slightly. The house should fill with a rich, meaty aroma.
- Make the glaze: in a small saucepan, combine soy sauce, honey, minced garlic, brown sugar, a splash of rice vinegar, and a drizzle of sesame oil. Bring to a simmer over medium heat, stirring until thickened and glossy, about 5-7 minutes.
- Unwrap the ribs: carefully open the foil—watch out for steam—and check for tenderness. The meat should be easy to pull apart with a fork.
- Broil for caramelization: brush the ribs generously with the glaze. Place under the broiler at 220°C (430°F), about 4-6 inches from the heat. Broil for 3-5 minutes, watching for a bubbling, caramelized crust that turns a deep amber.
- Repeat glazing: brush on more glaze and broil again if needed, until the surface is sticky, shiny, and slightly charred in spots. Keep an eye so it doesn’t burn.
- Rest and serve: let the ribs rest for 5 minutes. Slice or serve whole, with extra glaze on the side. The surface should be crackling slightly, with a smoky, sweet aroma inviting you in.
Rest the ribs loosely covered with foil for 5 minutes. Slice or serve whole, then spoon any extra glaze over for maximum stickiness. Let the surface set for a few minutes before diving in, so the glaze firms up slightly.
How to Know It’s Done
- Meat pulls back from bones, tender but not falling apart.
- Glaze is thick, glossy, and caramelized with a deep amber hue.
- Crackling surface with smoky aroma confirms proper caramelization.
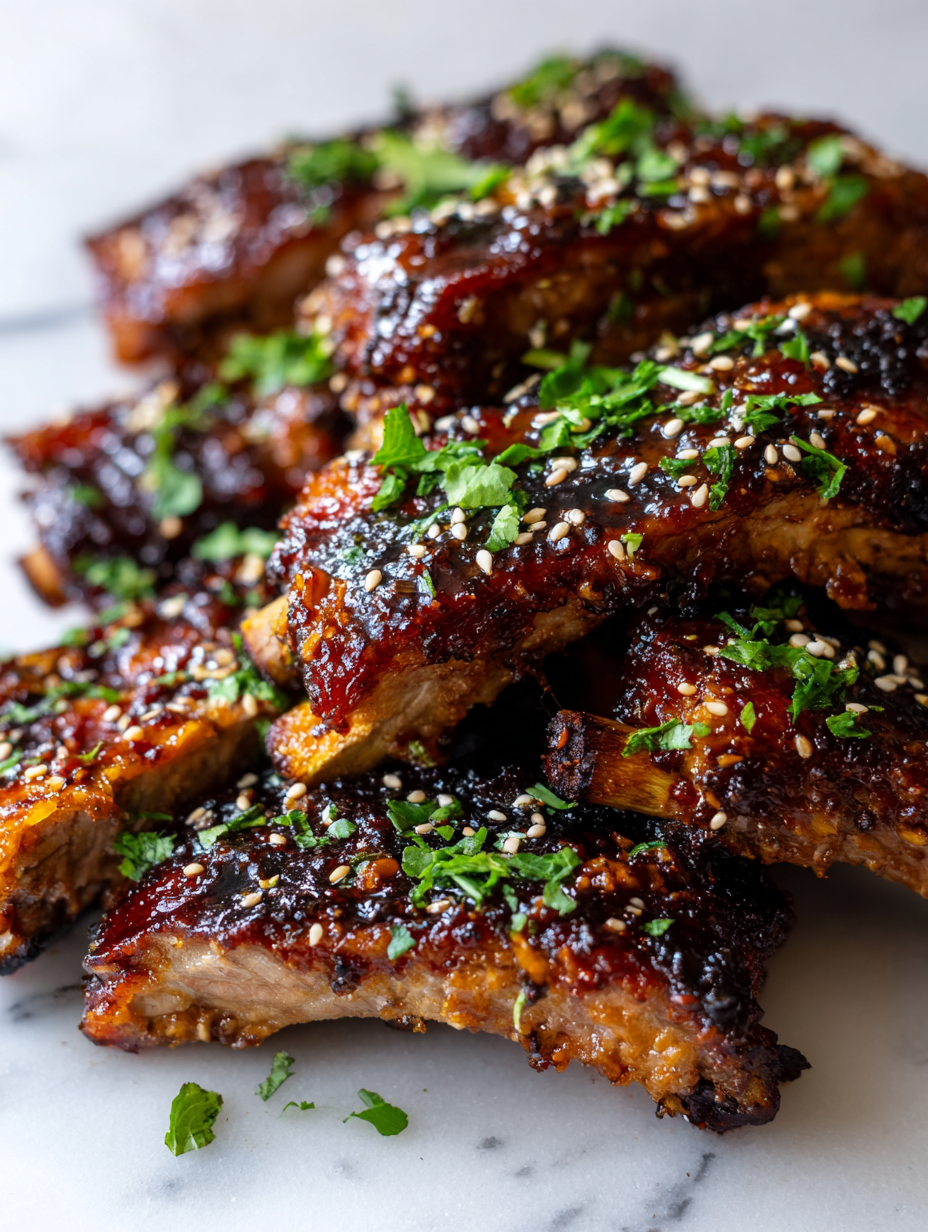
Sticky Caramelized Pork Ribs
Ingredients
Equipment
Method
- Preheat your oven to 150°C (300°F). Wrap the pork ribs tightly in aluminum foil, shiny side in, and place on a baking sheet. Bake slowly for about 2.5 to 3 hours until the meat is tender and pulls back from the bones, filling your kitchen with a rich, meaty aroma.
- While the ribs cook, combine soy sauce, honey, minced garlic, brown sugar, rice vinegar, and sesame oil in a small saucepan. Bring to a gentle simmer over medium heat, stirring constantly until the mixture thickens and turns a glossy, caramel-colored glaze, about 5-7 minutes. This aromatic sauce will be your sticky, smoky glaze.
- Once the ribs are tender, carefully remove the foil and check if the meat is easily pulling away from the bones. Unwrap and transfer the ribs to the unlined side of the baking sheet. Brush generously with the glaze, coating all sides evenly with a basting brush. The kitchen will smell sweet and smoky as you work.
- Place the glazed ribs under the broiler set at 220°C (430°F), about 4-6 inches from the heat source. Broil for 3-5 minutes, watching closely so the glaze bubbles and turns a deep amber, creating a shiny, caramelized crust. The sound of bubbling and the smell of roasting sugar will fill the air.
- Remove the ribs from the oven and brush on another layer of glaze for extra stickiness. Return to the broiler for another 2-3 minutes if needed, until the surface is crackling slightly and deep golden. Repeat glazing and broiling if you prefer a thicker, more caramelized coating.
- Once the glaze has developed a deep amber shine and the surface crackles gently, transfer the ribs to a cutting board or serving plate. Let them rest for about 5 minutes to allow the glaze to set, then cut into individual portions or serve whole, with extra glaze on the side. The surface should be glossy, sticky, and invitingly smoky.
Notes
Pro tips for sticky ribs
- Caramelization control: Keep a close eye on the glaze during broiling to prevent burning; it can go from perfect to charred quickly.
- Even glazing: Use a basting brush generously, and reapply multiple layers for a thick, glossy finish that’s addictive to look at.
- Heat management: When broiling, leave the oven door slightly ajar to prevent excess heat from turning your ribs into a smoky mess.
- Sticky fingers tip: Keep a damp cloth nearby to wipe your hands—sticky sauce on your fingers is inevitable but manageable.
- Sugar timing: Watch the glaze as it bubbles; once it deepens to a rich amber, it’s ready for that final broil to develop crust and flavor.
- Sauce consistency: If your glaze gets too thick before broiling, stir in a splash of water or soy to loosen it without losing flavor.
- Finishing touch: For extra shine, brush a little more honey or sesame oil on the ribs right after broiling for a beautiful, sticky sheen.
Common mistakes and how to fix them
- FORGOT to watch glaze: it can burn quickly—keep a close eye during broiling.
- DUMPED sauce too early: wait until it thickens and bubbles for maximum flavor and shine.
- OVER-TORCHED ribs: remove from heat immediately—they can go from perfect to burnt fast.
- MISSED resting time: let ribs sit for 5 minutes to allow juices and glaze to set properly.
Quick fixes and pantry swaps
- When sauce is too thick, splash in a little water and stir to loosen.
- If ribs stick to the foil, coat with a thin layer of oil before wrapping again.
- Splash some lemon juice if glaze burns—brightens flavor and cuts through char.
- Patch a crackling glaze by brushing with fresh honey and broiling briefly.
- Shield the ribs with foil if the surface caramelizes too quickly during broiling.
Prep, store, and reheat tips
- Prep the glaze ingredients—combine soy, honey, and spices a day ahead. The flavors meld beautifully overnight, making the final step quicker and more flavorful.
- Wrap the uncooked ribs tightly in plastic wrap and refrigerate up to 24 hours. The marinating process deepens the flavor and tenderizes the meat.
- Store cooked ribs in an airtight container in the fridge for up to 3 days. The glaze may thicken slightly; reheat gently to preserve moisture.
- To reheat, wrap ribs in foil and warm in a 150°C (300°F) oven for 20-25 minutes. The smell of caramelized glaze will rekindle, and the meat will stay juicy.
- Reheated ribs will be sticky and tender, with the glaze slightly caramelized around the edges. Expect a smoky aroma and a glossy, finger-licking surface.
Top questions about sticky pork ribs
1. How do I pick the best pork ribs?
Look for ribs with plenty of meat, especially around the bone. The meat should be pinkish and slightly marbled with fat, which helps keep them juicy during cooking.
2. How long should I cook the ribs?
Cooking times vary depending on the size and type of ribs. Usually, slow baking at 150°C (300°F) for about 2.5 to 3 hours results in tender, pull-apart meat.
3. When is the glaze done?
Apply the glaze in thick layers during the broiling step. Watch closely—when the surface bubbles and turns a deep amber, it’s ready to come out.
4. What if the glaze burns?
If the glaze starts to burn, lower the oven temperature slightly or move the ribs further from the broiler element. Keep a close eye—it’s quick to go from perfect to charred.
5. Should I rest the ribs after cooking?
Rest the ribs for about 5 minutes after cooking. This helps juices redistribute and the glaze to set, making each bite more tender and sticky.
6. Can I swap ingredients?
You can substitute soy sauce with coconut aminos for a milder, slightly sweeter flavor. Honey can be replaced with maple syrup, which adds a richer caramel note.
7. How do I apply the glaze?
Use a basting brush to evenly coat the ribs with glaze before broiling. Multiple layers will build that sticky, glossy crust that makes these ribs so irresistible.
8. How do I finish the ribs?
For extra shine and stickiness, brush on a little honey or sesame oil right after broiling. Let it sit for a minute to set before serving.
9. How do I store and reheat leftovers?
Wrap the ribs tightly in foil and store in the fridge for up to 3 days. Reheat in a low oven, covered, for 20-25 minutes until heated through and sticky again.
10. How do I fix thick or clumpy glaze?
If the sauce is too thick, stir in a splash of water or soy sauce to loosen it. When it shimmers and bubbles, it’s ready for another coat.
There’s something deeply satisfying about reaching for those sticky, caramelized ribs, especially when they glisten under a hint of smoky aroma. It’s a messy, imperfect process, but the rich, sweet, smoky crust makes every effort worth it. These ribs aren’t just food—they’re a small celebration of flavor in the middle of a busy week.
In the end, it’s about those moments of joy when you crack through that crispy exterior and reveal tender, flavorful meat inside. The lingering smell of caramelized glaze, the sticky fingers, and the slow, deliberate bites stay with you long after the last rib is gone. That’s what makes this dish a little special, no matter the occasion.

Hi, I’m Mason Harper, the voice and heart behind Rooting in Freshness. I’m so glad you’re here. This space was born from my love for seasonal ingredients, simple cooking, and the belief that food tastes better when it’s grown, chosen, and prepared with intention. Rooting in Freshness is more than a food blog to me. It is a reflection of how I live, cook, and connect with the world around me.

Leave a Reply