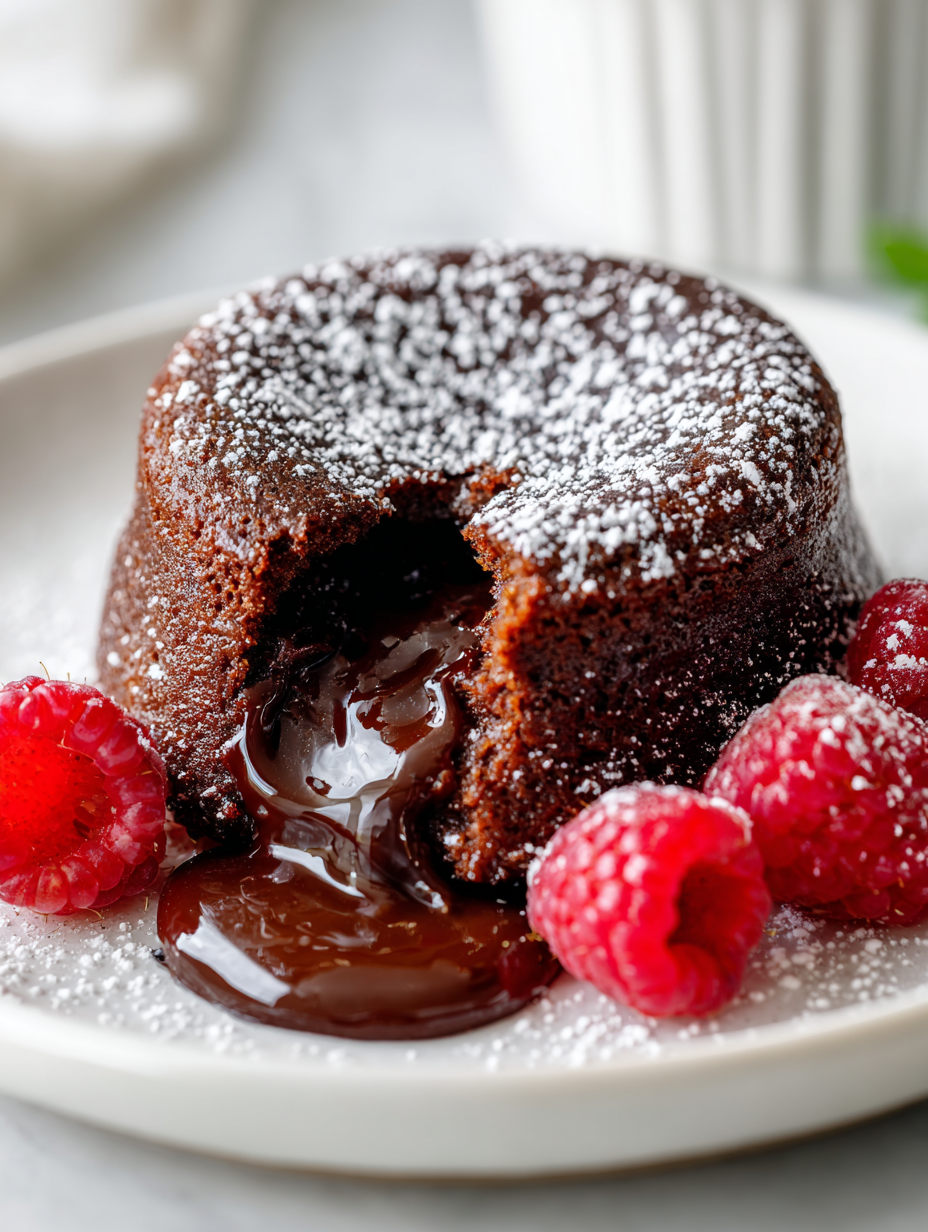
Getting that perfect gooey center in a chocolate fondant is like chasing a sweet little secret. It’s all about timing and oven quirks—something that can trip up even seasoned bakers if you’re not paying attention. I’ve spent countless afternoons testing different bake times, trying to lock in that molten core without turning the dessert into a cake.
What keeps me coming back to this recipe isn’t just the rich, velvety chocolate—it’s the thrill of pulling them out of the oven and knowing they’ll crack open to that warm, shiny center. It’s a small, imperfect art, really. Every oven has its own personality, and mastering that tiny window of perfection feels like a quiet little victory each time.
Focusing on the rare technique of achieving a perfectly gooey center in chocolate fondant, highlighting the importance of timing and oven variability for home cooks.
Chasing the Perfect Molten Core
- Baking this dessert always reminds me of lazy Sunday afternoons at my grandma’s house, where the smell of melting chocolate filled the air.
- There’s a quiet pride I feel when I pull these out of the oven just before they fully set—knowing I’ve caught that elusive gooey center.
- Sometimes, I get frustrated when they don’t turn out perfectly, but those moments push me to tweak oven temps and timing, making each attempt a little better.
- Sharing a warm fondant with friends feels like passing a secret—everyone’s faces light up at that first rich, chocolatey bite.
- I love how this recipe is a small act of rebellion against the overly polished desserts—here’s something perfectly imperfect, raw and honest.
The story behind this recipe
Making this chocolate fondant always takes me back to my early baking days, when I was obsessed with getting that perfect gooey center. I remember the first time I cracked the secret—I had overbaked, the center was just a puddle, but the flavor was there, and I was hooked. Since then, it’s been a quiet pursuit, tweaking oven times and ingredient ratios, chasing that fleeting moment of molten chocolate perfection. It’s a dish that feels like a small, sweet rebellion—messy, imperfect, but always worth the effort, especially when served warm with a dusting of powdered sugar or a scoop of vanilla ice cream.
Chocolate Fondant Trivia
- Chocolate fondant, also known as molten lava cake in some regions, has roots tracing back to French pastry traditions of the early 20th century.
- Its invention is often credited to French chefs experimenting with cake textures, aiming for that irresistible gooey center that contrasts with a firm exterior.
- The name ‘fondant’ refers to the smooth, melting quality of the chocolate interior, a term borrowed from classic French pastry language.
- Originally, the recipe was a high-end dessert served in upscale Parisian restaurants, but its popularity skyrocketed in the 1980s with the rise of home baking.
- A quirky bit: the key to a perfect fondant is timing—many home bakers have a love-hate relationship with their oven’s quirks, which makes it a fun challenge.
Key Ingredients Breakdown
- Unsweetened dark chocolate: I prefer a rich, slightly bitter bar—look for one with at least 70% cocoa. It melts smoothly and gives that deep chocolate flavor you can’t fake.
- Butter: Use good-quality unsalted butter, preferably with a little salt—makes the fondant taste more rounded and velvety. Keep it soft for easy melting.
- Eggs: Fresh eggs are best—they help create that tender, slightly elastic crumb. Don’t overbeat; just enough to blend smoothly.
- Sugar: Fine granulated sugar dissolves better in the batter—go for superfine if you have it. It contributes to the glossy crust and slight sweetness.
- Flour: Just a touch of plain flour stabilizes the structure without dulling that molten core. Sift it in to keep the batter light and airy.
- Butter + Chocolate: Melting these together creates a silky base—use a double boiler or microwave carefully, stirring until smooth and shiny. That sheen is your cue.
- Optional flavorings: A splash of vanilla or a pinch of sea salt can elevate the chocolate, adding complexity—experiment if you like that extra layer.
Spotlight on key ingredients
Dark chocolate:
- I prefer a rich, 70% cocoa bar—melts smoothly and delivers that deep, velvety flavor. Look for glossy, unblemished blocks for best results.
- Chocolate’s behavior: Melts into a shiny, smooth lava that’s crucial for that glossy, molten center. Watch for clumping if not chopped fine enough.
Butter:
- Use good-quality unsalted butter, softened for easy mixing. It contributes to that tender crumb and glossy crust—smell the nutty aroma as it melts.
- Butter’s quirks: Melts into a silky, fragrant base that helps the batter hold its shape but still remain gooey inside. Too hot, and it can seize; too cold, it won’t blend well.
Ingredient Swap Tips
- Dairy-Free: Swap butter with coconut oil or a neutral-tasting vegetable oil. Expect a slightly different richness and texture, but still deliciously moist.
- Vegan Chocolate: Use plant-based butter and vegan dark chocolate. The flavor remains deep, though the texture might be a touch softer.
- Less Sweet: Replace sugar with coconut sugar or a touch of honey. The fondant will have a more complex, caramel-like note.
- Gluten-Free: Substitute all-purpose flour with almond flour or gluten-free baking blend. Keep an eye on the batter’s consistency—may need a slight adjust.
- Intense Chocolate: Use a higher cocoa content chocolate (85%+). The fondant gets more bitter and intensely chocolatey, a real grown-up twist.
- Lighter Version: Reduce sugar slightly or add a splash of milk to the batter. It’ll be less dense but still satisfyingly gooey.
- Extra Flavour: Add a pinch of chili powder or a dash of espresso powder to boost the chocolate depth—just enough for a subtle kick.
Equipment & Tools
- Ramekins: To bake individual servings and shape the fondant.
- Double boiler or microwave: To melt chocolate gently without burning.
- Mixing bowls: To combine ingredients smoothly.
- Spatula or wooden spoon: To fold ingredients gently and avoid deflating batter.
- Baking sheet: To hold ramekins steady during baking.
- Cooling rack: To rest ramekins briefly before unmolding.
Step-by-step guide to chocolate fondant
- Preheat your oven to 200°C (390°F). Grease your ramekins generously with butter, then dust with cocoa powder to prevent sticking.
- Chop 200g of good-quality dark chocolate into small chunks. Melt it gently in a double boiler or microwave in short bursts, stirring until smooth and shiny. Set aside to cool slightly.
- In a separate bowl, soften 100g of butter and mix it with 150g of superfine sugar until well combined and slightly fluffy. Use a spatula or wooden spoon.
- Add 3 large eggs, one at a time, to the butter-sugar mixture, whisking gently after each addition until just combined. Incorporate a teaspoon of vanilla extract if desired.
- Stir in the melted chocolate gradually, folding gently to keep the batter airy. Sift in 50g of all-purpose flour and fold until just incorporated. Do not overmix.
- Divide the batter evenly among the prepared ramekins, filling each about three-quarters full. Smooth the tops with a spatula.
- Place the ramekins on a baking sheet and bake for exactly 12-14 minutes. The edges should be set, but the center still soft and slightly wobbly when gently shaken.
- Remove from oven and let rest for 1 minute. Use a small knife to loosen the edges if needed, then carefully invert each ramekin onto serving plates. Gently lift off the ramekin.
- Serve immediately while the center is molten and gooey. Optionally, dust with cocoa powder or serve with a scoop of vanilla ice cream.
- Enjoy the crack of the crust as you cut into the fondant, revealing the warm, oozing chocolate core—the ultimate moment of indulgence.
Let the fondants rest for 1 minute after baking. Invert onto plates gently, then serve immediately with optional toppings. The contrast between the crispy top and molten center is what makes this special.
How to Know It’s Done
- Edges are firm and slightly golden, center jiggles gently when shaken.
- A toothpick inserted halfway in the center comes out with moist crumbs, not wet batter.
- The top forms a thin, glossy crust with a crackle sound when tapped lightly.
Chocolate Fondant
Ingredients
Equipment
Method
- Preheat your oven to 200°C (390°F). Generously butter each ramekin and dust with cocoa powder, tapping out the excess to prevent sticking.
- Chop the dark chocolate into small pieces and melt it gently using a double boiler or microwave in short bursts, stirring until smooth and glossy. Let it cool slightly.
- In a separate bowl, soften the butter and mix it with superfine sugar until the mixture is pale and slightly fluffy, about 2 minutes.
- Add the eggs one at a time, whisking gently after each addition until just combined and the mixture is smooth.
- Gradually pour the melted chocolate into the egg mixture, folding gently with a spatula to maintain airiness and create a smooth batter.
- Sift the flour over the batter and fold gently until just incorporated; avoid overmixing to keep the mixture light.
- Divide the batter evenly among the prepared ramekins, filling each about three-quarters full and smoothing the tops.
- Place the ramekins on a baking sheet and bake in the preheated oven for 12-14 minutes, until the edges are firm but the center still jiggles slightly when gently shaken.
- Remove the ramekins from the oven and let them rest for 1 minute. Carefully run a small knife around the edges to loosen and then invert each onto serving plates.
- Gently lift off the ramekins, revealing the shiny, cracked crust and molten chocolate center. Serve immediately with a dusting of cocoa powder or a scoop of vanilla ice cream.
- Enjoy the contrast of the crisp exterior and irresistibly gooey, warm center that flows with every cut.
Tips & Tricks for Perfect Fondant
- Bolded mini-head: Ensure your chocolate is chopped into small, uniform pieces for quick, even melting—no lumps.
- Bolded mini-head: Use room temperature eggs; they incorporate more smoothly, helping your batter stay airy and light.
- Bolded mini-head: Gently fold in the flour—overmixing can deflate the batter and prevent that perfect gooey center.
- Bolded mini-head: Keep an eye on your bake time; even a minute too long can turn molten into firm cake.
- Bolded mini-head: Rest the fondants for at least 1 minute after baking—this helps set the crust without losing the molten core.
- Bolded mini-head: For a shiny crust, brush the top with a little warm butter or a light dusting of cocoa powder right out of the oven.
- Bolded mini-head: When in doubt, slightly under-bake—edges should be firm, center still jiggly, that’s your sweet spot.
Common mistakes and how to fix them
- FORGOT to check oven temperature → Use an oven thermometer for accuracy.
- DUMPED batter too quickly → Pour gently to avoid air bubbles and uneven baking.
- OVER-TORCHED the fondant → Reduce baking time or check earlier to prevent a dry crust.
- MISTAKENLY used cold eggs → Bring eggs to room temperature for better incorporation and rise.
Quick fixes and pantry swaps
- If the fondant cracks, splash a little warm water around the edges to loosen and re-shape.
- When the center isn’t molten enough, patch with a quick 10-second microwave melt and serve immediately.
- DUMPED the batter into the ramekin too quickly? Gently tap the ramekin on the counter to settle the batter evenly.
- Over-baked and lost the gooey core? Rescue with a quick microwave blast—10 seconds—until just soft again.
- When in doubt, swap dark chocolate for milk chocolate—less intense, but still rich and satisfying.
Prep, store, and reheat tips
- Preparing the batter a day ahead is possible—cover and refrigerate for up to 24 hours. The flavor develops slightly overnight, but the texture might be a touch denser after reheating.
- Store baked fondants in an airtight container in the fridge for up to 2 days. Reheat gently in the oven at 150°C (300°F) for 5-7 minutes until just warmed through, watching for melting and softening the crust.
- Unbaked batter freezes well for up to 1 month—portion into ramekins, cover tightly, and freeze. Bake directly from frozen, adding 2-3 minutes to the baking time. Expect a slightly firmer core but still gooey.
- Reheating can cause the fondant to lose its molten center if overdone. Look for a warm, fragrant aroma and a slight jiggle in the center—these cues signal it’s ready to serve hot and luscious.
Top questions about chocolate fondant
1. How do I get the perfect molten center?
A molten center is achieved by baking just enough so the edges are set but the inside remains gooey. Timing is key—usually around 12-14 minutes at 200°C (390°F).
2. What if my fondant isn’t gooey enough?
If the fondant is too firm, it may be overbaked or the batter was too thick. To fix, bake for less time or chill the batter before baking.
3. How do I know when my fondant is done?
Check the edges—they should be firm and slightly golden. The center should jiggle gently when shaken, and a toothpick inserted should come out moist, not wet.
4. Which chocolate should I use?
Use high-quality dark chocolate (70% cocoa or more) for rich flavor and smooth melting. For a different taste, try a bittersweet or semi-sweet bar.
5. Can I make this in advance?
Yes, you can prepare the batter a day ahead. Cover and refrigerate up to 24 hours. Bake straight from the fridge, adding a couple of minutes to the baking time.
6. What if my fondant cracks or overbakes?
If the top cracks or the crust becomes hard, cover the fondant with a warm cloth or lightly brush with warm butter to soften. For uneven baking, adjust oven temperature slightly or bake shorter.
7. How do I unmold the fondant easily?
Ensure your ramekins are well-greased and dusted with cocoa powder or flour to prevent sticking. Use a spoon to gently loosen edges before flipping.
8. How do I reheat leftovers without losing the gooey center?
When reheating, do so at low temperature (around 150°C / 300°F) for 5-7 minutes. Watch for the aroma and slight jiggle to avoid overmelting.
9. What’s the best way to check doneness?
Use a thermometer to check the internal temperature—around 60°C (140°F) for a molten center. The exterior should be just firm and golden.
10. Can I make a dairy-free chocolate fondant?
For a dairy-free version, use coconut oil instead of butter and dairy-free dark chocolate. Expect a slightly softer texture but still rich flavor.
Pulling a warm, gooey chocolate fondant from the oven feels like catching a fleeting secret—there’s something quietly satisfying about that perfect crack when you cut in. It’s a dish that demands attention, but rewards with that luscious, molten core that melts in your mouth.
In times when I need a small act of rebellion against overly polished desserts, this fondant reminds me that imperfection is part of the charm. Sharing it with someone special makes the moment even sweeter, a simple pleasure that sticks around long after the last spoonful.

Hi, I’m Mason Harper, the voice and heart behind Rooting in Freshness. I’m so glad you’re here. This space was born from my love for seasonal ingredients, simple cooking, and the belief that food tastes better when it’s grown, chosen, and prepared with intention. Rooting in Freshness is more than a food blog to me. It is a reflection of how I live, cook, and connect with the world around me.


Leave a Reply