This smoothie bowl is my way of sneaking childhood comfort into busy mornings. It’s like spooning a spoonful of peanut butter and jelly, but in a way that feels fresh and nourishing. I love how the familiar flavors can still surprise me when blended with a splash of coconut milk and topped with crunchy granola.
There’s something about turning a classic PB&J into a cold, creamy bowl that sparks a little joy. It’s simple enough for a quick breakfast, but satisfying enough to keep me full until lunch. Plus, it’s the kind of recipe that makes you feel like a kid again, even if you’re just standing in your kitchen, spoon in hand, morning light coming in.
Transforming childhood comfort food into a nutritious, portable breakfast that combines nostalgic flavors with modern health-conscious choices.
Nostalgia in a Bowl
- This bowl takes me back to childhood mornings, the smell of peanut butter and jam filling the kitchen air.
- I love how blending frozen berries with peanut butter creates this unexpectedly luscious, almost ice-cream-like texture.
- There’s a quiet satisfaction in topping it with crushed graham crackers, a little crunchy reminder of s’mores nights.
- Sometimes I toss in a handful of spinach — sneaky greens that don’t steal the sweet, nostalgic flavor.
- This recipe feels like a tiny rebellion against rushed mornings, a moment to indulge in simple, honest comfort.
The story behind this recipe
- This recipe started as a lazy weekend experiment, trying to capture that nostalgic childhood snack in a bowl. I wanted something that felt familiar but was also a bit more grown-up, with richer textures and deeper flavors. The first time I blended peanut butter and jelly with frozen bananas, I was surprised how creamy and indulgent it turned out, almost like dessert for breakfast.
- It’s become my go-to when I need a quick hit of comfort that still feels nourishing. The combination of that salty peanut butter and sweet jam, chilled and smooth, hits a strange, satisfying spot I didn’t even realize I was missing. Now, it’s a little ritual—whipping this up on hectic mornings or lazy weekends, my personal take on childhood memories with a modern twist.
- heading: ‘The story behind this recipe’
Trivia and Historical Notes
- The classic peanut butter and jelly combo dates back to the early 20th century, becoming a staple in American lunchboxes.
- In the 1940s, jelly sandwiches gained popularity during wartime, praised for their simplicity and portability.
- Smoothie bowls like this often draw inspiration from traditional breakfast blends but reimagined for modern quick eats.
- Peanut butter itself was first marketed commercially in the late 1800s, originally promoted for its protein richness and versatility.
- The combination of sweet and salty flavors in this bowl echoes a culinary trend that’s been evolving for decades, now in a chilled, creamy format.
Ingredient breakdown: key components
- Peanut Butter: I prefer a creamy, slightly salty variety that melts smoothly into the blender—swap for almond butter if you want a nuttier, less sweet twist.
- Jelly: I use a bright, fruit-forward jam like strawberry or raspberry—try swapping for a chia seed jam if you want extra fiber and a jelly-like texture.
- Frozen Bananas: They’re my secret to that thick, ice-cream-like creaminess—replace with frozen mango for a tropical vibe or avocado for extra richness.
- Coconut Milk: Full-fat makes it luscious and smooth—light coconut milk works if you want a less intense coconut flavor or experiment with almond milk for a nutty note.
- Sweetener: A drizzle of honey or maple syrup brightens the flavor—skip or reduce if your jam is very sweet, or try a splash of agave for a neutral sweetness.
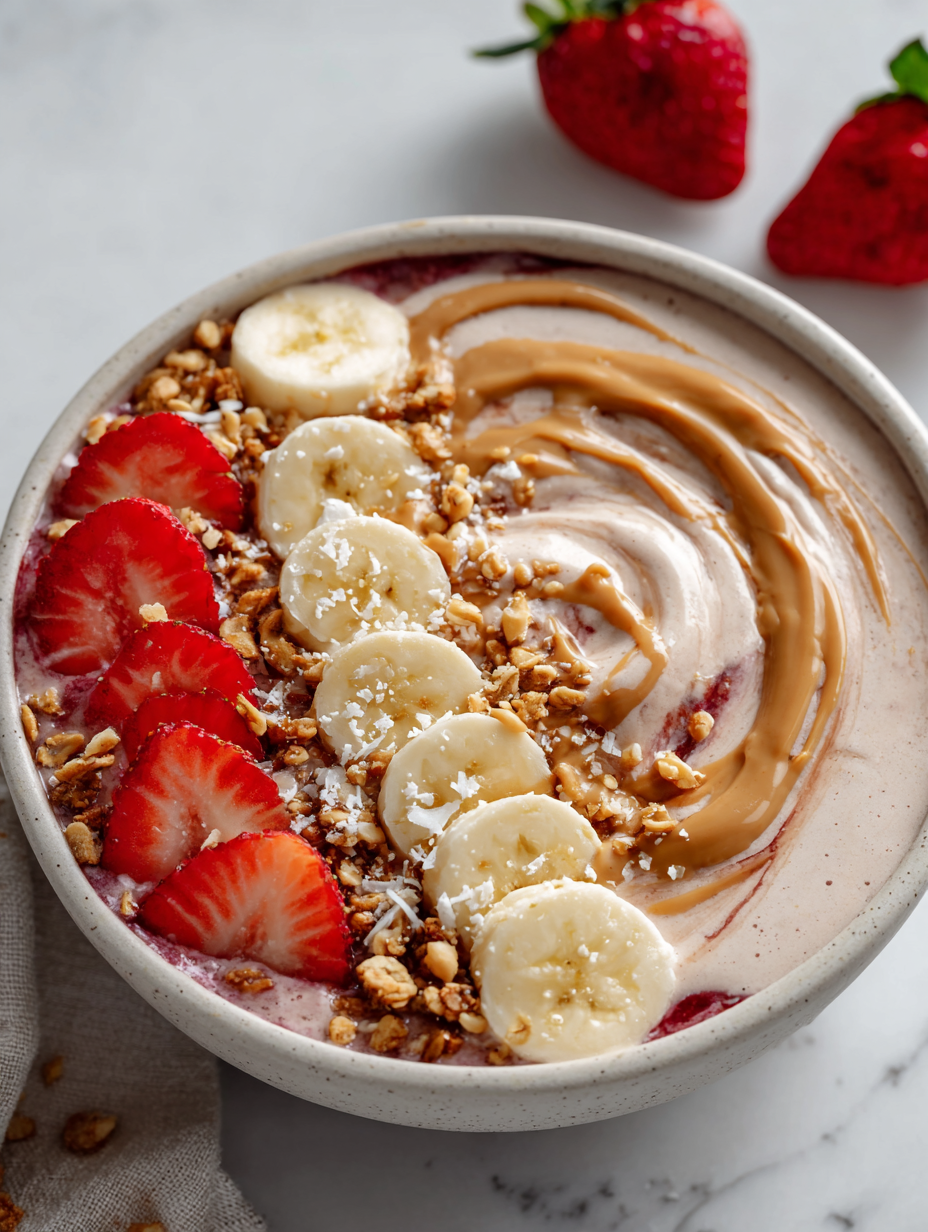
- Toppings: Granola, crushed nuts, or fresh berries add crunch—swap for toasted coconut flakes or cacao nibs for different textures and flavors.
Spotlight on key ingredients
Peanut Butter & Jelly:
- Peanut Butter: I prefer a creamy, slightly salty variety that melts smoothly into the blender—swap for almond butter if you want a nuttier, less sweet twist.
- Jelly: I use a bright, fruit-forward jam like strawberry or raspberry—try swapping for a chia seed jam if you want extra fiber and a jelly-like texture.
Notes for ingredient swaps
- Dairy-Free: Swap cow’s milk with almond, cashew, or oat milk—each adds a different nutty or neutral note, keeping it vegan and smooth.
- Nut Butter: Use sunflower seed butter or tahini instead of peanut butter for nut allergies—expect a slightly different flavor profile, still creamy.
- Jam: Replace with fresh mashed berries or a spoonful of fruit compote if you want a less processed, more vibrant fruit hit.
- Bananas: Frozen mango or peaches can boost the tropical vibe—if you prefer a milder sweetness, avocado adds creaminess without overpowering.
- Sweetener: Honey or agave syrup can be swapped with maple syrup or a date paste—adjust for sweetness, but keep in mind the flavor nuance.
- Toppings: Granola or nuts can be replaced with toasted coconut flakes, cacao nibs, or fresh sliced fruit—each adds a different crunch or freshness.
- Coconut Milk: Light coconut milk offers a less intense coconut flavor; almond or cashew milk keeps it lighter, but less creamy.
Equipment & Tools
- Blender: To create a smooth, creamy mixture from frozen bananas and ingredients.
- Small saucepan: To gently warm toppings or melt additional ingredients if needed.
- Spoon: For scooping, mixing, and spreading toppings.
- Bowl: To serve the smoothie bowl in an appealing, shareable way.
Quick Guide to the Smoothie Bowl
- Gather your equipment: a blender (high-speed is best), a small saucepan, a spoon, and a bowl for serving.
- Measure out 2 ripe bananas—preferably frozen beforehand to enhance creaminess. Slice into smaller chunks for easier blending.
- Add 2 tablespoons of peanut butter—creamy style for smooth blending. If you like a saltier punch, go for a natural, unsweetened variety.
- Stir in 2 tablespoons of your favorite jam—strawberry or raspberry work well. For a twist, try a chia seed jam for extra texture.
- Pour in 1/2 cup of coconut milk—full-fat yields a richer, silkier bowl. Adjust quantity for your preferred thickness.
- Blend on high speed for about 30 seconds—stop and scrape down the sides if needed. The mixture should be thick, smooth, and oozy but scoopable.
- Check consistency: it should hold its shape when spooned but still be soft. If too thick, add a splash more coconut milk and blend briefly.
- Taste the blend: if it’s too salty or not sweet enough, consider a tiny drizzle of honey or maple syrup, then pulse again.
- Spoon the smoothie into a bowl—aim for a generous mound with a glossy top. Smooth the surface with the back of a spoon.
- Finish with toppings: granola, sliced berries, crushed nuts, or a drizzle of extra jam. Let your creativity run wild!
- Rest the bowl for 1 minute—this lets the flavors meld slightly and the surface settle.
- Serve immediately with a spoon—enjoy the thick, creamy, nostalgic flavor with each bite.
Let the bowl sit for about a minute to settle. Finish with your favorite toppings and serve immediately for best texture and flavor.
How to Know It’s Done
- The mixture is thick but scoopable, with a glossy surface and no liquid pooling.
- The blend smells sweet and nutty, with a fragrant hint of fruit from the jam.
- The texture is smooth and creamy, holding its shape when spooned without being runny.
PB&J Smoothie Bowl
Ingredients
Equipment
Method
- Place the frozen banana slices into your blender and add the peanut butter, jam, and coconut milk.
- Blend on high speed for about 30 seconds until the mixture is thick, smooth, and creamy, with a glossy appearance. Stop and scrape down the sides if needed.
- Taste the blend and if you’d like it a bit sweeter, add a drizzle of honey or maple syrup, then pulse a few more seconds to combine.
- Spoon the thick, creamy mixture into a bowl, smoothing the top with the back of a spoon for an even surface.
- Top the smoothie with granola, fresh berries, or nuts for added crunch and color.
- Let the bowl sit for a minute to settle, then serve immediately with a spoon, enjoying the thick, nostalgic flavor with each spoonful.
Notes
Pro tips for perfect smoothie bowls
- Bolded mini-head: Use frozen bananas directly from the freezer—no need to thaw, they blend into a creamy, ice-cream-like texture.
- Bolded mini-head: Add ingredients in stages—start with liquids and softer items first, then blend in tougher ingredients for a smoother mix.
- Bolded mini-head: For extra creaminess, pulse in a handful of ice cubes at the end—cold, thick, and satisfying.
- Bolded mini-head: Keep an eye on blending time—about 30 seconds usually does it, stop sooner for a slightly chunkier texture.
- Bolded mini-head: Taste and adjust sweetness before serving—sometimes a tiny drizzle of honey or extra jam makes all the difference.
- Bolded mini-head: Use a spatula to scrape down sides—this ensures everything blends evenly and avoids lumps.
- Bolded mini-head: For toppings, sprinkle just before serving—to preserve crunch and vibrant color, avoid sogginess.
Common mistakes and how to fix them
- FORGOT to check the blender’s speed—use high for smoothest results.
- DUMPED in all ingredients at once—add gradually for better control over texture.
- OVER-TORCHED the toppings—toast nuts or granola on low heat, stir frequently.
- FAILED to taste test before serving—adjust sweetness or saltiness to balance flavors.
Quick Fixes & Pantry Swaps
- When mixture looks too thick, splash in more coconut milk and pulse briefly.
- If jam is too runny, add a pinch more frozen banana for thicker texture.
- Splash hot water on toppings to loosen stubborn granola and make it crunchier.
- Patch overrun blender by stopping and stirring ingredients with a spatula.
- Shield from freezer burn by storing banana slices in an airtight bag, and add a splash of lemon juice to prevent browning.
Prep, store, and reheat tips
- Prep the frozen banana slices and measure ingredients the night before to save time in the morning. The fruit should be firm, with no freezer burn smell.
- Store pre-measured portions of jam and nut butter in small containers or jars—keeps everything tidy and ready to blend. Keep in a cool, dry place or fridge for up to a week.
- The smoothie bowl is best enjoyed fresh, but you can store leftovers in an airtight container in the fridge for up to 24 hours. Expect some separation; give it a quick stir and a sniff before serving.
- Reheating isn’t necessary; just give the bowl a good stir if it’s been refrigerated. For a slightly warmer version, briefly warm the jam or nut butter in the microwave (10 seconds), then swirl it into your bowl.
Top questions about PB&J Smoothie Bowl
1. Can I use fresh bananas instead of frozen?
Use frozen bananas for that thick, creamy texture, almost like soft serve. Fresh bananas will make it runnier.

2. Can I substitute peanut butter with other nut butters?
Yes, you can swap peanut butter for almond or sunflower seed butter, which gives a different nutty flavor.
3. What if my smoothie is too thick to blend?
Add a splash of milk or water if the blend is too thick and isn’t blending smoothly.
4. Can I use any type of jam?
Use any berry jam you like, but bright, fruit-forward jams like strawberry or raspberry work best for flavor.
5. Do I need to add extra sweetener?

Yes, you can omit the sweetener if your jam is very sweet, or add a little honey or maple syrup for extra sweetness.
6. What toppings work best for this bowl?
Toppings like granola, sliced berries, or crushed nuts add crunch and texture. Feel free to mix and match based on what you have.
7. How long can I store the smoothie bowl?
The bowl is best enjoyed immediately to keep the toppings crunchy and the texture fresh.
8. How do I fix separation or reheating issues?
If it separates, just give it a quick stir. To reheat, warm the jam slightly and swirl it in.

9. How can I change the consistency?
Adjust the amount of coconut milk to get your preferred thickness—less for thicker, more for creamier.
10. What equipment is best for blending?
Use a high-speed blender for the smoothest results. Stop and scrape down the sides if needed.
This peanut butter & jelly smoothie bowl is more than just a nostalgic breakfast; it’s a quick way to bring comfort and a splash of childhood joy into busy mornings. The creamy texture and familiar flavors make every spoonful feel like a small, indulgent moment.
Whenever I make this, I’m reminded that simple ingredients, combined thoughtfully, can turn into something unexpectedly satisfying. It’s a reminder to embrace the small, comforting rituals—especially when life gets hectic or the seasons shift and crave a little sweetness.

Hi, I’m Mason Harper, the voice and heart behind Rooting in Freshness. I’m so glad you’re here. This space was born from my love for seasonal ingredients, simple cooking, and the belief that food tastes better when it’s grown, chosen, and prepared with intention. Rooting in Freshness is more than a food blog to me. It is a reflection of how I live, cook, and connect with the world around me.


Leave a Reply